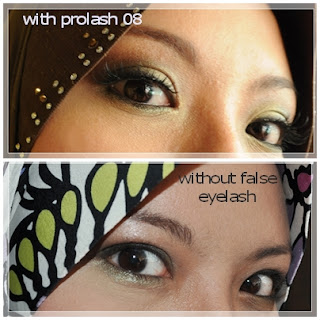
I'm sorry because of the poor lighting the photos. It has been a really moody and rainy day, I took these pictures in the morning when it was going to rain so i was loosing day light (natural light) very fast, that is much needed for a photo shoot. So i had to turn on the lights later, but non the less i think it turned out great despite the yellow-ish picture (my house has only yellow lights ...)
For Face i use:
Face:
Litebase foundation in 4Y
Perfector concealers 3Y and 4Y
loose powder in 4Y
Blush:
Entice
Fairy
Lips:
Ivoluxe lipstick in Lush & Blossom
lip definity (lipliner) in bare
For the Eyes i use:
Suade
Moss
Cat's eye
Fairytale
crystalline
techno
(yeah i know whole lotta eye colors, buts its all about blending and layering ^_^)
Liquid pencil in ebony
browcake in taupe
Prolash 08
the difference that it makes with and with out pro lash.
i was using pro lash 08.
i was using pro lash 08.
_______________________________________ .............
ok i did this 'diagram' on how to get the look and mark numbers on areas to apply the eyeshadow. Its not perfect, but i hope you get the picture.
Before you start to apply any eye makeup, i suggest you use eyebase/primer first. This way you'll get the true color of the eyeshadow and helps to prevent creasing. Apply eye base after foundation.
- Area 1: is the area that you would want to apply highlights. Apply Crystalline in area 1, this area is on and above brow bone. Its the bony area area of the eyes. Apply this right up to the inner corner of the eyes.
- Area 2: is the area that i want to start to layer, i use fairytale or any pastel pink hue will do. Pink is a beautiful combo with green, its unusual but its beautiful! besides i want to soften the look other wise your eyes will look too engaging ^_^. Blend Fairytale on the crease just below the brow bone.
- Area 5: I only mark it near the inner corner but its actually the whole eyelid. apply the lightest green shade - Suede on the entire eye lid, blend it towards the outer corner eyelid (according to your eye shape) blend it upwards. Also apply it at the rims of your eyes, below your water line.
- Area 4: Center of eyelids. Apply a similar eye color but more intense, in this care is Moss. Apply to the center of eyelids, blend outwards to the outer corner of the yes. Then layer it also below your eyes below waterline.
- Area 3: Its the outer corner of the eye and its where you want to start creating depth. Use the darkes shade of green, I'm using Cat's eye. This color is brilliant in creating smokey eyes effect as it has dark almost black under tone to it but you can still see the green, its A Mazing! anyway, just dap a little of it, dust it off a little once you dab (this will minimize mistake) then apply on the outer corner of the eyes, from the diagram, area 3 is actually overlapping on area 2, 3, 6., its like C shape, apply starting on 3 then blend it to 6 then 2, with the excess of the application. This will create the smokey effect.
- Use clean blending brush to blend everything out. Then use a flat liner brush to line your eyes with Cat's eye as close to the lash as possible and around the rim of the eyes. then blend a little, up wards /out wards.
- Area 1.1: Lastly inner corner of the eyes near the tear ducts. Apply a dab of Crystaline. this will give you a more open & bright eye look.
p/s: I'll try and do a better instruction with step by step picture next time.


No comments:
Post a Comment